CPU in verilog
A 5-level Pipelined RISC-V Processor
This is a project for the course Computer Architecture I took in 2023. I spent most of my time in July and August debugging the code and analyzing the waveforms on Vivado. I’ll primarily cover some parts of the pipelined CPU here.
Experiment setup
- Vivado
I had planned to use ModelSim but Vivado is just the right tool with abundant functionalities and clean interface. In the Vivado platform, circuit design code can be written using Verilog HDL and then synthesized, placed, and routed. It also provides a rich library of IP cores, accelerating the design and implementation process. Through Vivado’s simulation tools, designs can be verified and debugged to ensure functional and timing correctness. In this experiment, bitstreams were generated, and the pipelined CPU was also tested through simulation in Vivado before hardwired into the board.
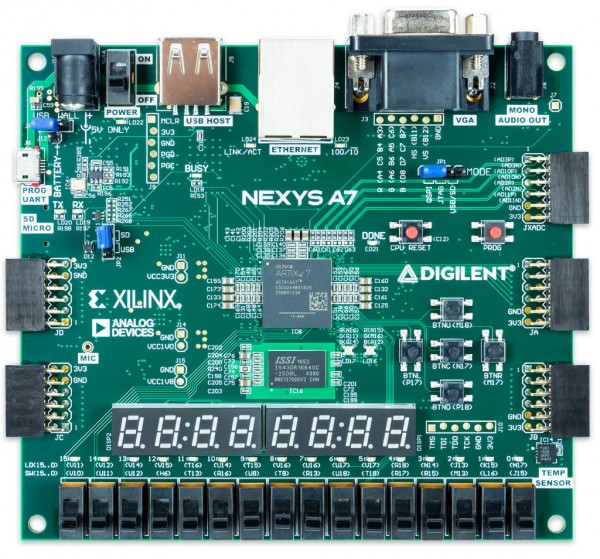
- The Nexys A7 board
The Nexys A7 is a development board based on the Artix-7 FPGA, suitable for experiments in computer organization. It features a variety of peripheral interfaces, including buttons, switches, LEDs, seven-segment displays, and a VGA interface, making it convenient for connecting input/output devices. By using Verilog HDL and the Xilinx Vivado development suite, the designed circuit code can be loaded onto the Nexys A7 board for verification and debugging.
- The Venus platform
In this experiment, the Venus platform was used as the development and simulation environment for computer organization principles. Venus is an online experiment platform developed by UC Berkeley. It provides an interactive environment, so I could debug and assemble RISC-V assembly code.
Pipeline overall design
The schematic of the pipeline used in the experiment is shown in the figure.

- Some data paths in the single-cycle process are omitted in the diagram.
- The black arrows in the figure represent the direction of data transmission between modules.
- The circular modules represent components used to handle data hazards and control hazards, marked in blue.
- The diamond-shaped modules are used for updating the PC (Program Counter), marked in red.
- The cloud-shaped modules represent functionalities that are not implemented as separate Verilog files but are directly integrated within the CPU module.
The following section provides explanations for the key parts shown in the diagram.
Every project has a beautiful feature showcase page. It’s easy to include images in a flexible 3-column grid format. Make your photos 1/3, 2/3, or full width.
To give your project a background in the portfolio page, just add the img tag to the front matter like so:
---
layout: page
title: project
description: a project with a background image
img: /assets/img/12.jpg
---


You can also put regular text between your rows of images. Say you wanted to write a little bit about your project before you posted the rest of the images. You describe how you toiled, sweated, bled for your project, and then… you reveal its glory in the next row of images.


The code is simple. Just wrap your images with <div class="col-sm"> and place them inside <div class="row"> (read more about the Bootstrap Grid system). To make images responsive, add img-fluid class to each; for rounded corners and shadows use rounded and z-depth-1 classes. Here’s the code for the last row of images above:
<div class="row justify-content-sm-center">
  <div class="col-sm-8 mt-3 mt-md-0">
    {% include figure.liquid path="assets/img/6.jpg" title="example image" class="img-fluid rounded z-depth-1" %}
  </div>
  <div class="col-sm-4 mt-3 mt-md-0">
    {% include figure.liquid path="assets/img/11.jpg" title="example image" class="img-fluid rounded z-depth-1" %}
  </div>
</div>